Help center/beatfader
User guide
beatfader
Everything you need to install beatfader, map it to your mixer and play beats with any fader.
Welcome
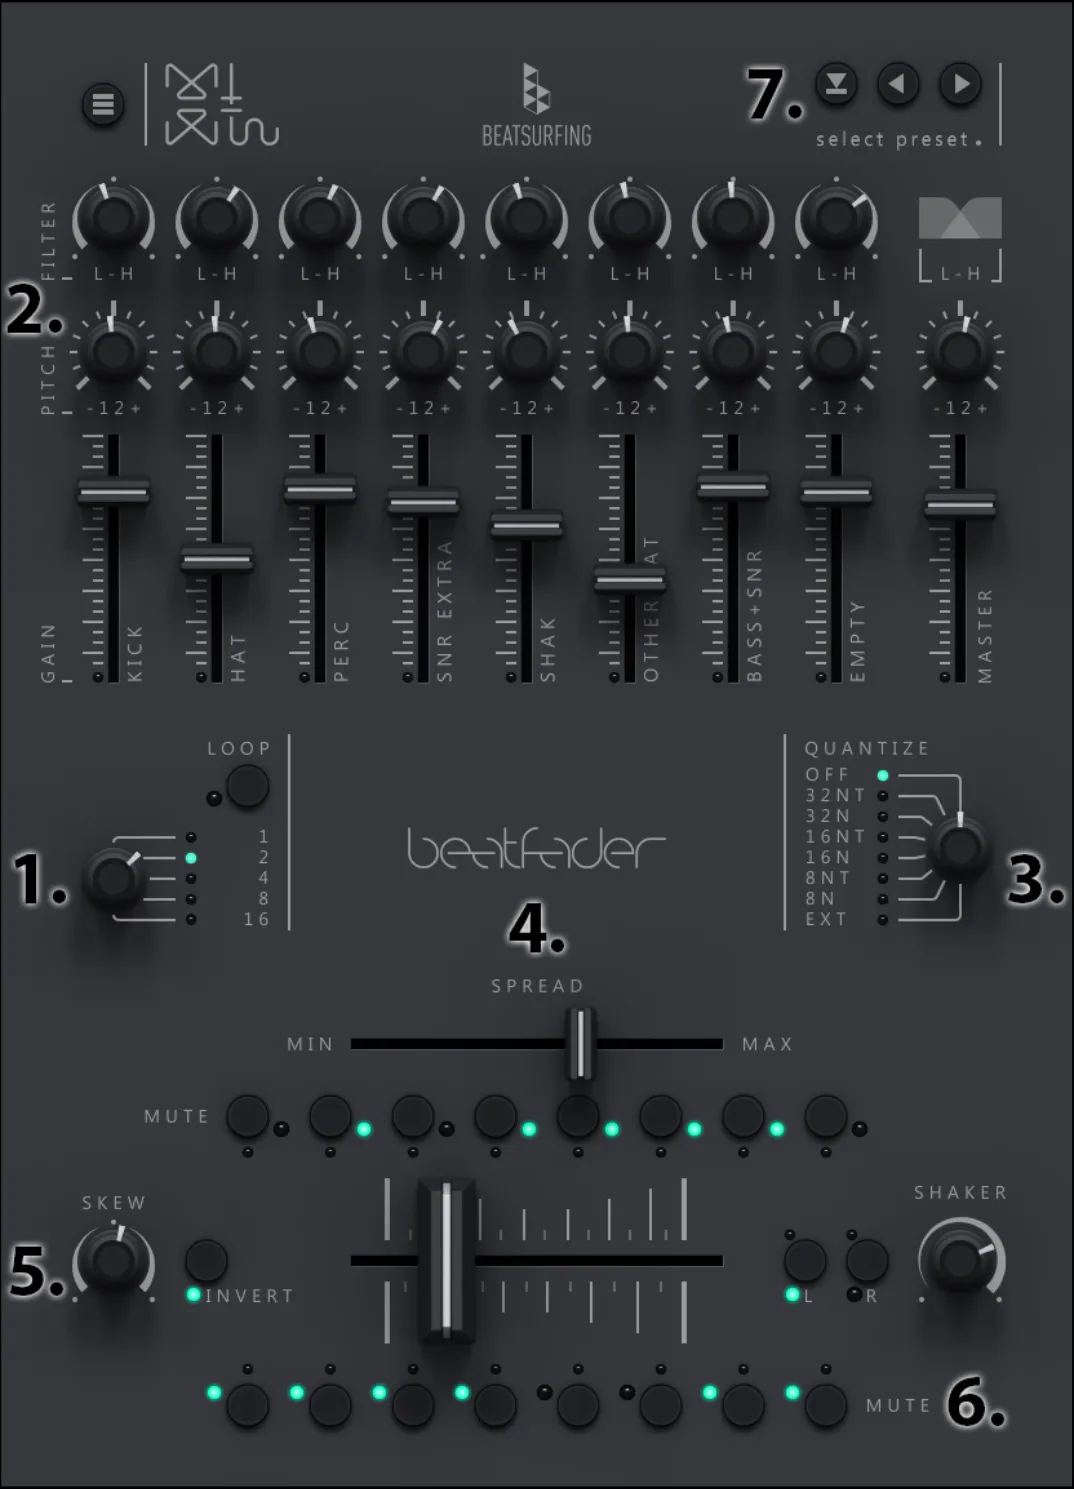
Meet beatfader
Play beats with any fader, knob or MIDI controller.
- 1. Loop your performance
- Selectable loop lengths let you live-loop your beats effortlessly.
- 2. Sound sculpting
- Individual gain, pitch and filter controls for each sound, to tune your beat to perfection.
- 3. Quantization
- Change the quantization amount for a whole new feel.
- 4. Spread
- Add margins to the sides of the fader, compressing the distribution of the notes.
- 5. Skew your drums
- Invert or skew the notes for constant creative variations.
- 6. Mute
- Mute each note individually for transitions and breakdowns.
- 7. Sound library
- Loads of kits, and you can create your own: your drum palette is limitless.
Where to start
Quick start
System requirements
beatfader runs as a plugin in your DAW on Windows and macOS.
Windows
- Windows 10
- 2 GHz Pentium IV processor or equivalent
- A host that supports 32-bit or 64-bit VST
- At least 130 MB free disk space
- Formats: VST, VST3
macOS
- macOS 10.13 High Sierra or later
- Intel or Apple Silicon processor
- A host application that supports 64-bit VST or AudioUnit
- At least 130 MB free disk space
- Formats: AU, VST, VST3
Quick start
Installation
Download the installer for your system, run it, then enter your license code the first time you open beatfader.
Windows
- Download the Beatfader-X.X.X.exe installer file.
- Install to your preferred plugin folder.
- On first launch, enter your license code.
macOS
- Download the Beatfader-X.X.X.pkg installer file.
- Follow the steps to install. The plugins are installed to the default location: /Library/Audio/PlugIns.
- On first launch, enter your license code.
After purchasing beatfader, your license key appears on your Licenses page: beatsurfing.com/my-account/license-keys.
Quick start
Activating & deactivating the license
Each license you buy lets you activate the plugin on 3 computers at a time.
If you need to run it on another machine, first deactivate the plugin's license on one of your machines.
When a license is deactivated
Your plugin is still usable, but in a frozen state: your existing sessions will load the plugin and its parameters in their last saved state. However, you won't be able to access the user interface to tweak its parameters.
Using beatfader
Set up beatfader in Ableton Live
MIDI-map beatfader to your MIDI controller or DJ mixer, and play it in sync with your DAW.
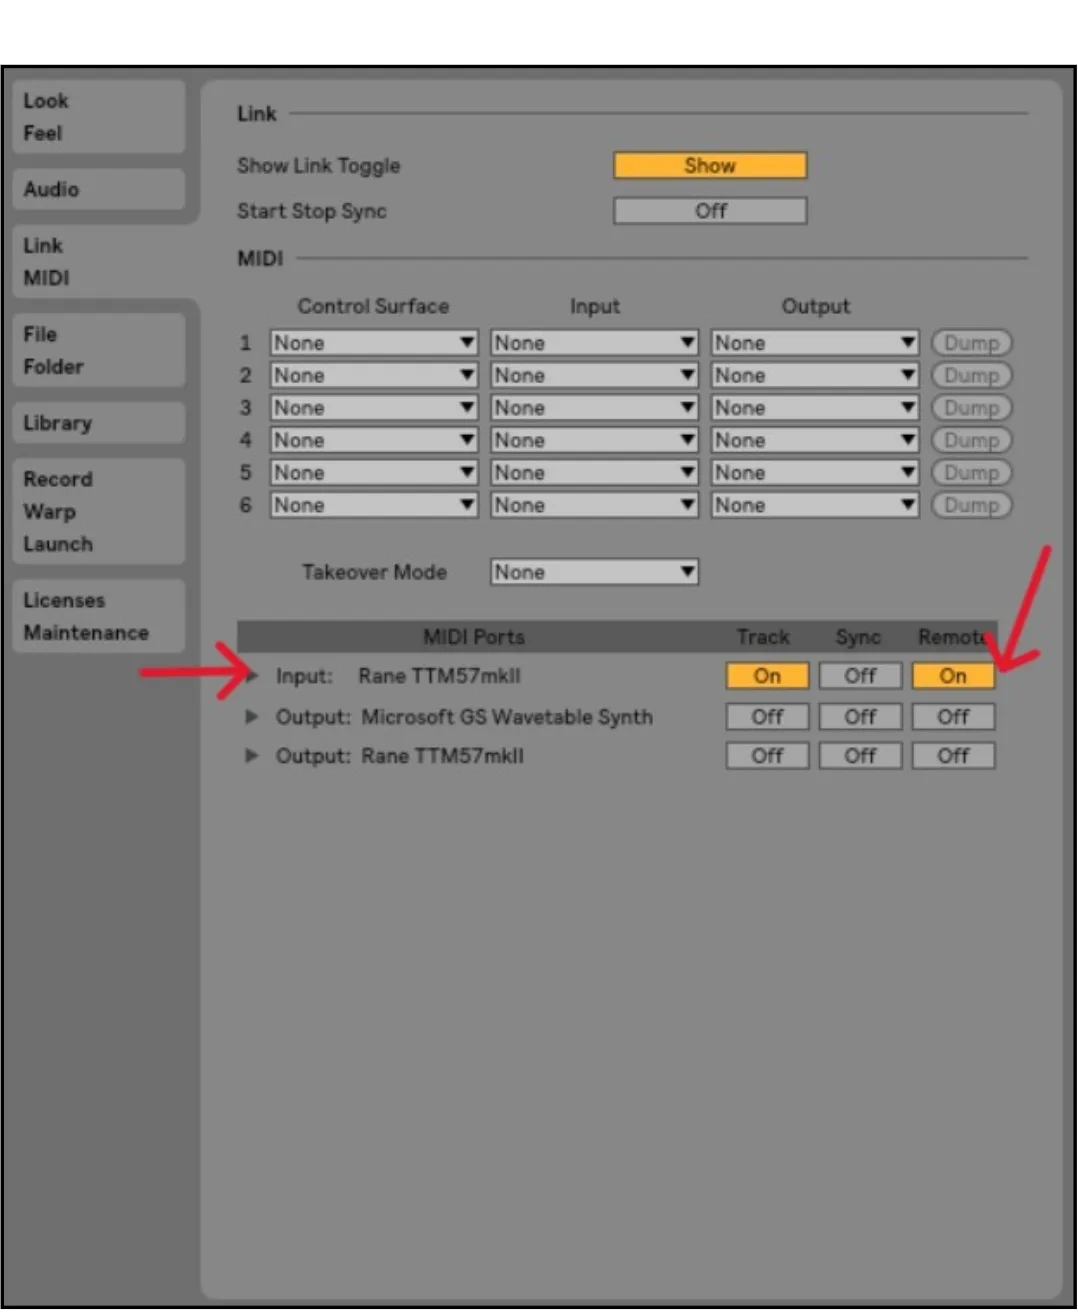
Enable MIDI Remote
- Plug your DJ mixer's or MIDI controller's USB cable into your computer.
- Open Ableton Live and go to Options › Preferences.
- Select the MIDI tab.
- In the MIDI Ports section, find your mixer or controller.
- Turn on Remote for its input.
Map beatfader to your mixer or controller
- Add beatfader on a MIDI track and expand the plugin's parameter view with the small arrow in the parameters section: you now see every mappable part of beatfader.
- Turn on MIDI Map mode with the MIDI button at the top right of Ableton, or the shortcut ⌘ Cmd + M (Mac) or Ctrl + M (Windows).
- Click the function you want to map, for example the fader in the parameter view, then move a fader, knob or any MIDI control on your controller.
- The control is mapped. Repeat for every other control you want to map: looper, pitch, volumes…
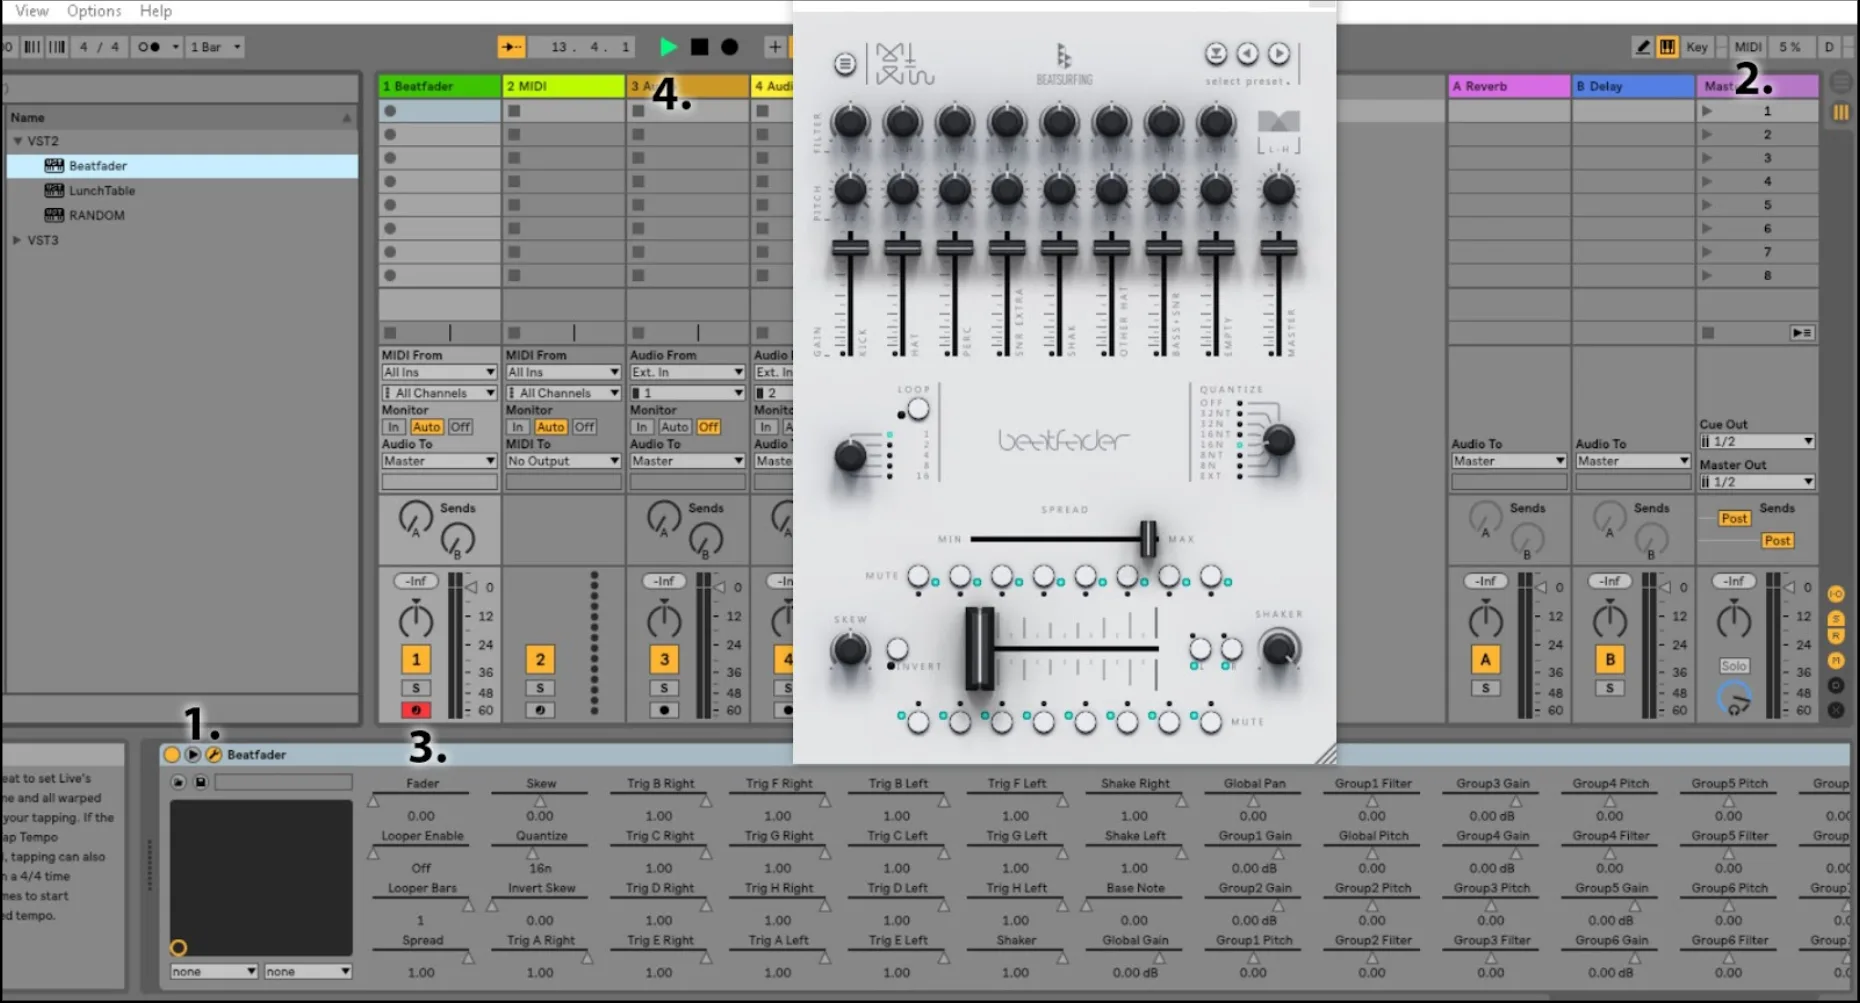
Exit MIDI Map mode and press play: quantization only works while the transport is running.
Using beatfader
MIDI mapping in other DAWs
The idea is the same in every DAW. These tutorials show how MIDI mapping works in each one.
Using beatfader
Create your own kits
Use beatfader's MIDI output to build your own kits or add more sounds to your setup.
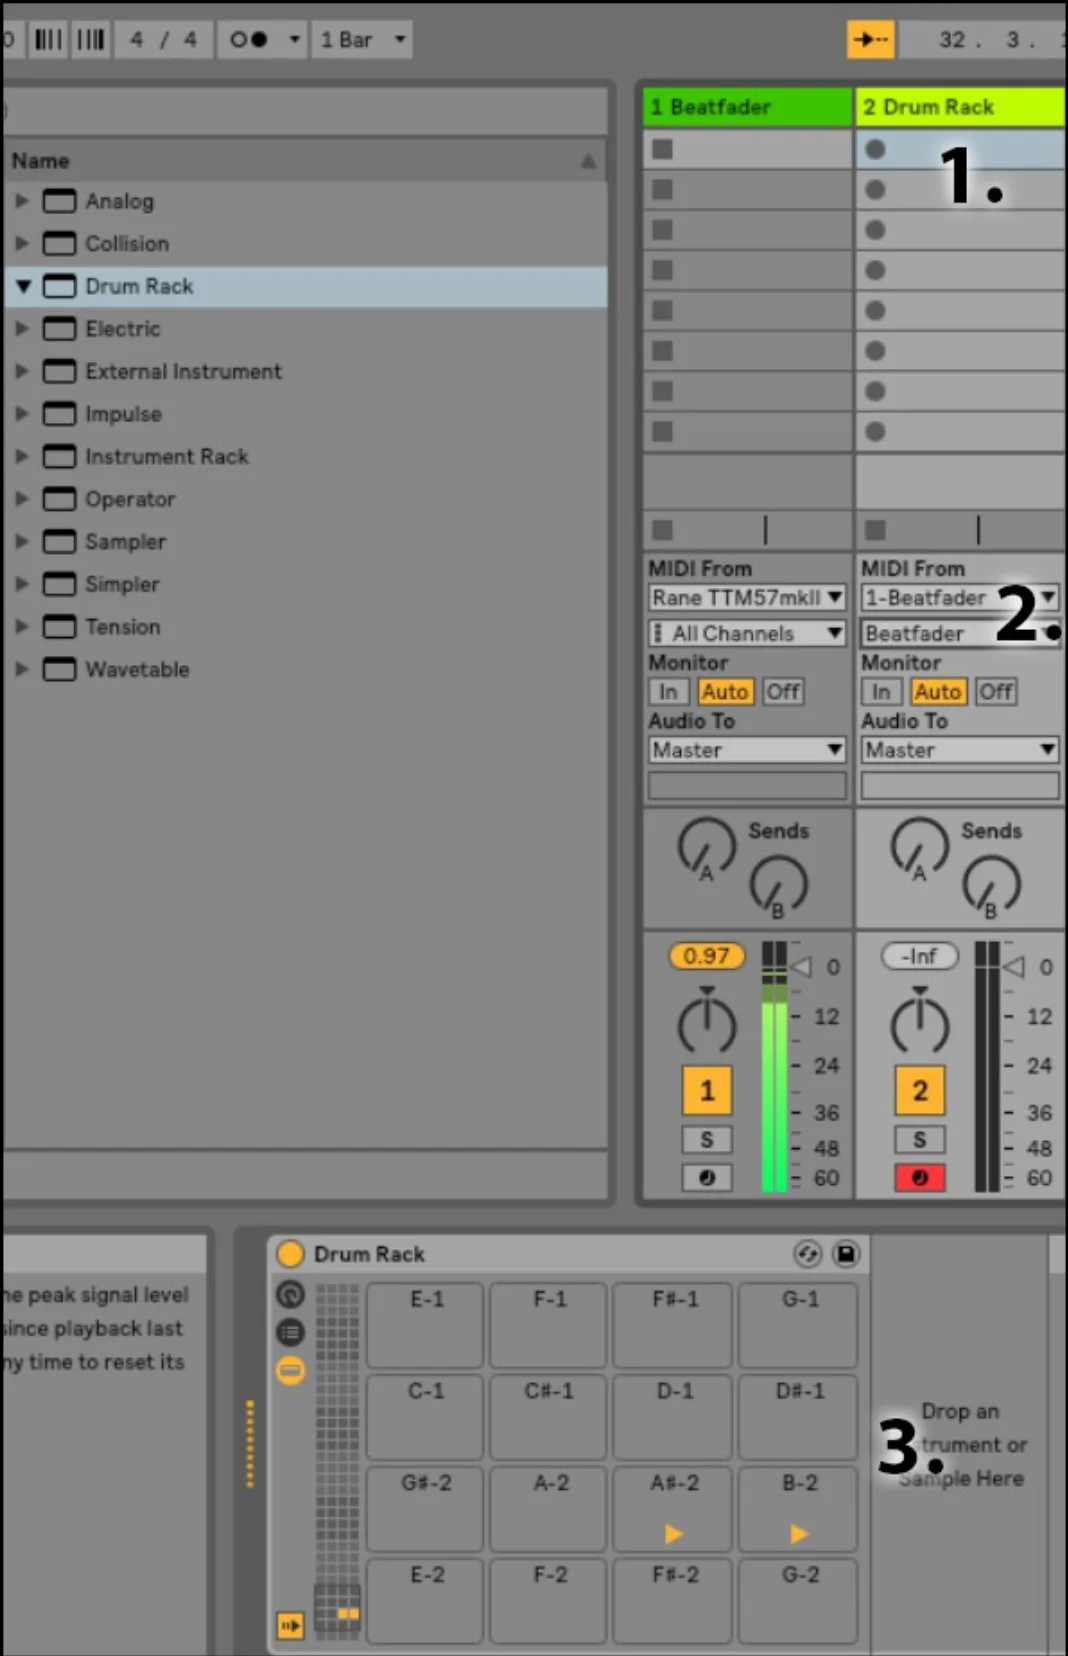
- Create another MIDI track and drag a Drum Rack onto it.
- On the new track, under MIDI From, select your beatfader track for both the input and the channel.
- beatfader now triggers the pads of the Drum Rack. Use the MIDI chart to build your own kits.
You can also start from this example project: a Drum Rack replicating the “Zenithrust” factory preset.
Using beatfader
Quantize
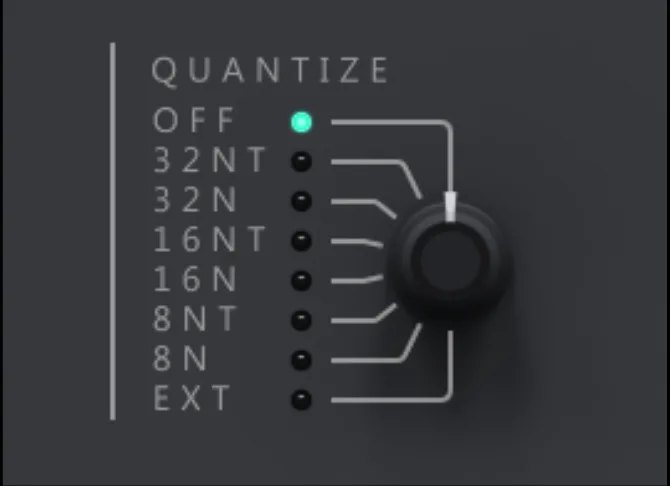
Choose how each instance of beatfader quantizes what you play.
You may want one instance to quantize to 8th notes only, or a faster-feeling rhythm on 32nd notes. Select the amount in the Quantize section.
Try several instances of beatfader on one fader, each with a different quantization: you get great rolling sounds and rhythms.
Quantize to an external source
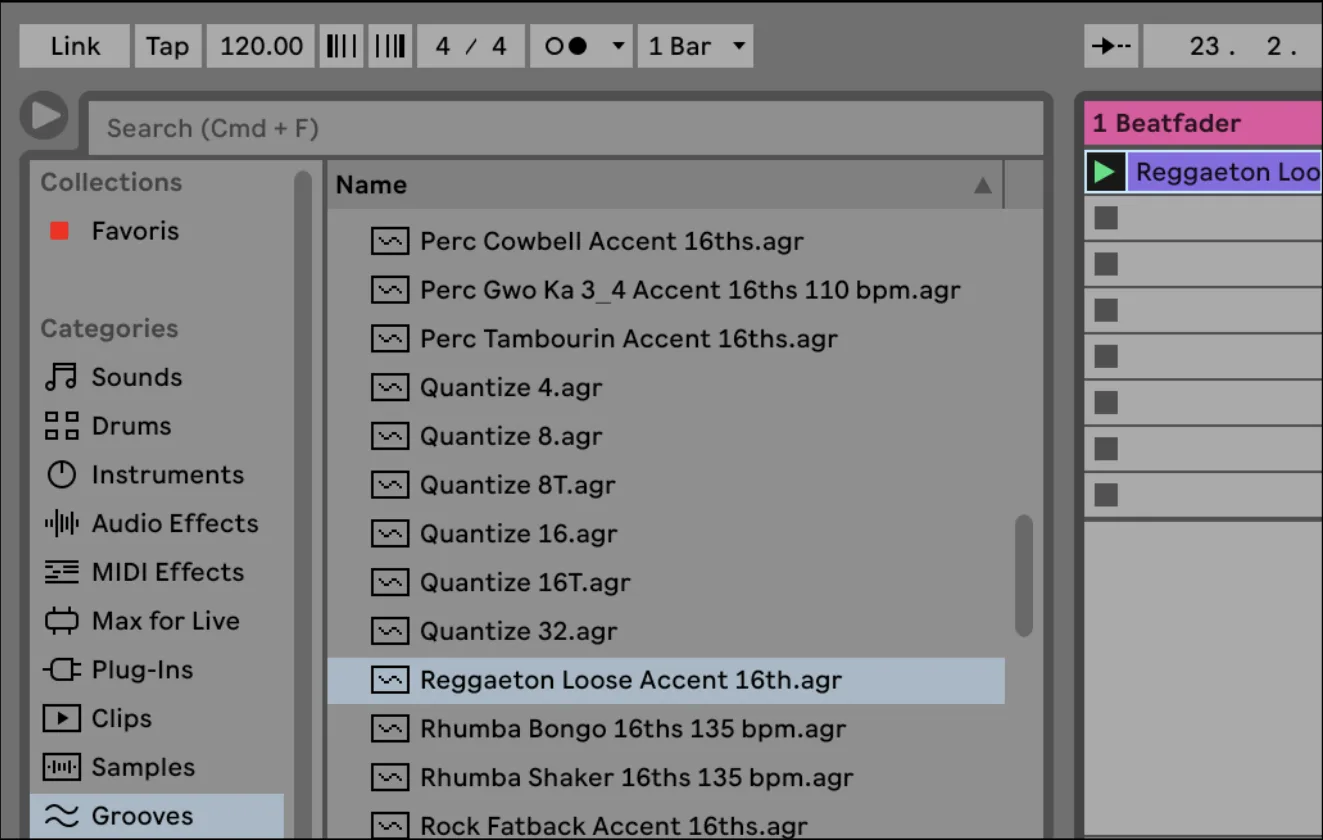
You can also quantize to an external source, for example an Ableton groove. Select EXT in the Quantize section, then drag a groove onto your beatfader track: beatfader now plays to the notes of the groove.
Using beatfader
Live looper
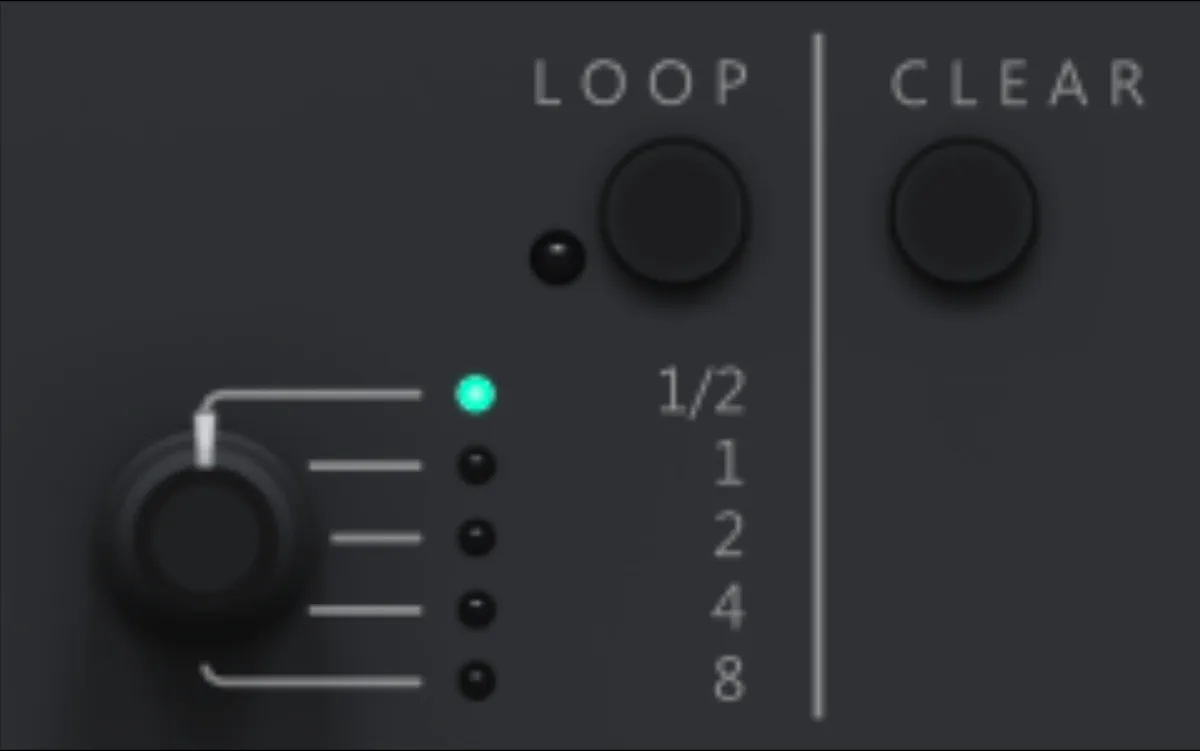
beatfader has a built-in live looper to make loops on the fly, with different bar lengths.
Click Loop to turn it on: whatever you last played over the selected number of bars loops. Move the fader or knob again to overwrite the loop, or click Clear to erase it.
Try mapping the Loop button to a button or pad on your mixer, and the loop length to a knob: you can then switch the loop and change its length on the fly for fills and rhythms.
Grace Time
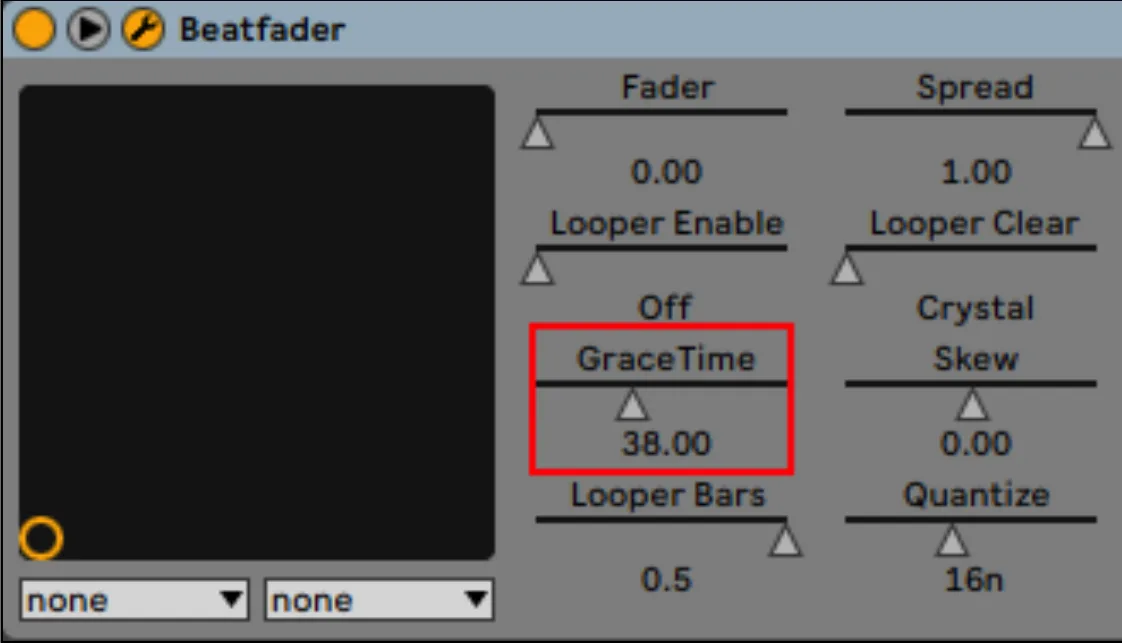
Grace Time sets how quickly the loop responds to new input. It's 150 ms by default; you may want to lower it at faster tempos or with half-bar loops, for more reactive loops.
You'll find it in the plugin's generic parameter list, as shown here in Ableton Live.
Using beatfader
MIDI chart
The MIDI notes beatfader sends, to build your own kits.
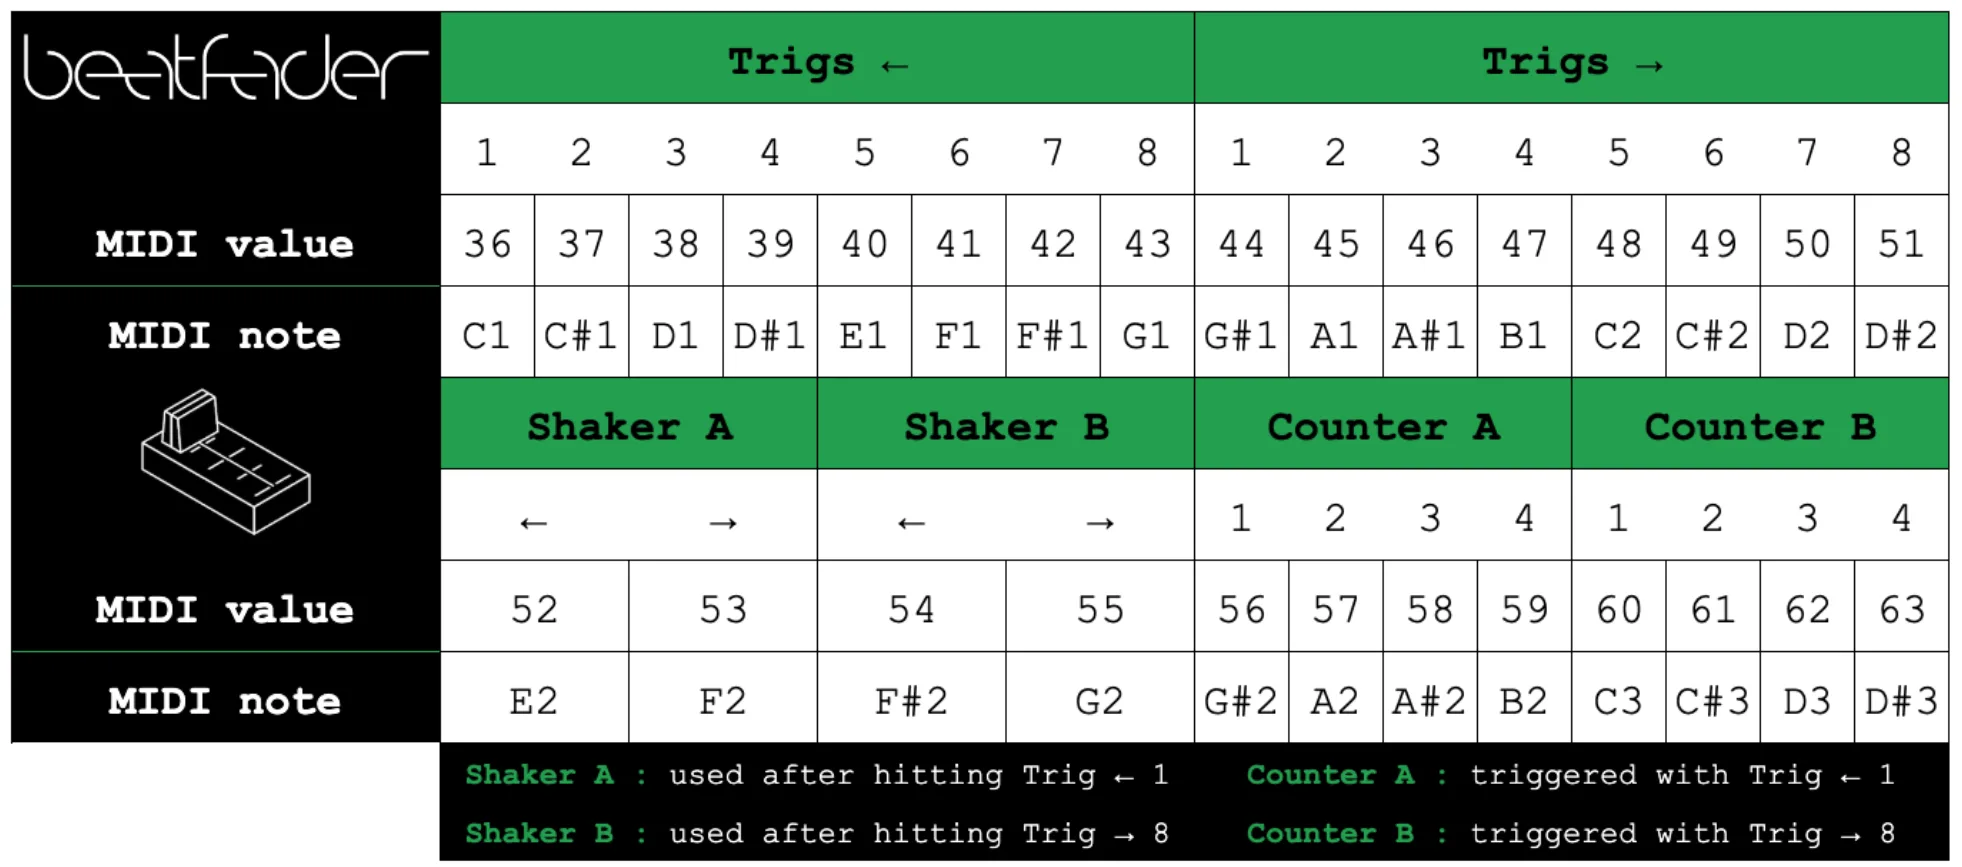
You can offset all the MIDI values by exposing the Base Note parameter in your DAW.
Help
Support
Can't find your answer in this guide? Everything else is in the BEATSURFING Help center.
Contact us
Thank you for choosing beatfader. Don't hesitate to reach out with any questions or ideas: send us a message from the Help center.
The BEATSURFING team
 Login with Google